
Atlassian don’t officially support AD FS with Confluence Cloud – but it is working well now I’ve sorted out the issues I was having passing user’s email address through as the nameId claim. Hopefully these instructions can save you some trial and error.
Enable SAML on Atlassian Cloud
- First off – enable SAML on your Atlassian Cloud instance at https://<subdomain>.atlassian.net/admin/saml/edit
- The Identity Provider Entity ID can be found in the Federation Service Properties in ADFS – but typically will look like mine –
https://adfs.jamesnimmo.co.nz/adfs/services/trust
- Identity Provider SSO URL can be found in AD FS Service > Endpoints – look for the SAML 2.0 type, but it should just be
https://adfs.jamesnimmo.co.nz/adfs/ls
- Open up your token signing certificate in AD FS, then select ‘Copy to file’ from the Details tab. Save with Base64 encoded as a txt file – then copy the contents into the Public x509 certificate field.
- Save configuration
Add Relying Party Trust wizard
- Add a Relying Party Trust to AD FS. On the welcome page select ‘Enter data about the relying party manually’
- Select a display name – i.e. Atlassian Confluence
- Use the AD FS profile (supports SAML 2.0)
- Leave the token encryption certificate blank
- Enable support for the SAML 2.0 WebSSO protocol – and enter the SP Assertion Consumer Service URL from the Atlassian Site Administration > SAML section. Currently this is:
https://id.atlassian.com/login/saml/acs
- For the relying party trust identifier, enter the SP Entity ID – currently this is
https://id.atlassian.com/login
Please note, do not be tempted to add additional relying party trust identifiers (I had added some others in here which caused it not to work)
- Optionally configure multi factor authentication settings
Configure the claim rules
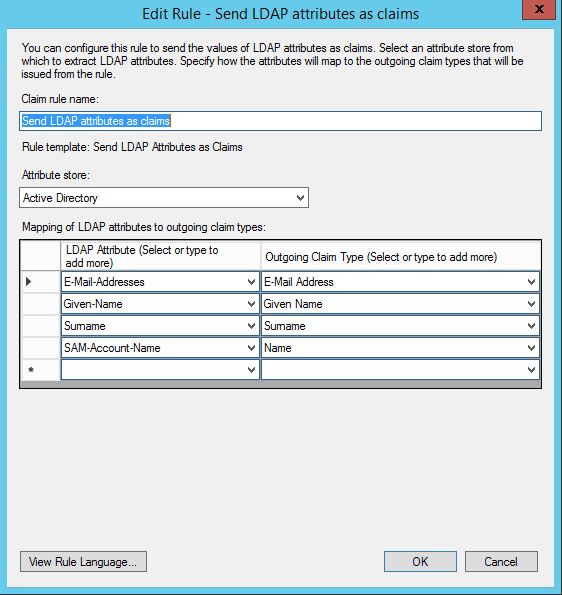
- First create a rule to send attributes from Active Directory to Atlassian Cloud. I think the only mandatory claim is the email address.
- Next, add a second rule to Transform an incoming claim
(this is another step I hadn’t figured out the first time I tried to configure SAML – without this step it seems like ADFS doesn’t use the right format for the outgoing name ID).
Test it out
I haven’t got Identity Provider initiated sign on working yet (via the /adfs/ls/idpinitiatedsignon.aspx) – but if you use a RelayState URL – and then put this in your corporate bookmarks etc it should work nicely (replace the <yoursubdomain> part
https://adfs.jamesnimmo.co.nz/adfs/ls/idpinitiatedsignon.aspx?RelayState=RPID%3Dhttps%3A%2F%2Fid.atlassian.com%2Flogin%26RelayState%3Dhttps%3A%2F%2F<yoursubdomain>.atlassian.net
Leave a Reply